Configuring JBoss for Windows Integrated AuthenticationBefore Getting Started Be sure that you have read and successfully performed ALL of the steps in the pre-flight documentation before proceeding any further. You will also want to read through the install for Tomcat before starting the install for JBoss. The install for JBoss share many similarities with the install for Tomcat.
The main differences are: 1) JBoss does not use a login.conf file
but instead uses a login-config.xml file located at
Finally, confirm that the server is on the domain by going to

We want to be sure that the host/server is on the domain. If during install of Windows Server you did not specify to join a Domain, you can click the "Change..." button now to join the Domain. Downloading and Installing JBoss Go to the JBoss web site and download a stable version of JBoss. The example in this guide is based on the jboss-4.2.3.GA.zip download. Also, this guide is based on JBoss being started from the command-line versus JBoss running on the server as a Windows Service. If you have Tomcat installed as a Windows Service, be sure to stop Tomcat and specify the Tomcat Windows Service "Startup Type" as "Manual". This is necessary even if you change the HTTP port. Unzip the download to your \Temp directory: 
Since we are not installing JBoss as a Windows Service, we can go right to making sure we can start JBoss from the command-line. To start JBoss from the command-line, cd to the bin directory
and type the following: Downloading spnego.jar You can download the latest version of spnego.jar from sourceforge. Place the spnego.jar file under the 
Modifying the web.xml file Copy the web.xml configuration changes from the
Tomcat install and apply them
to JBoss' web.xml file under the 
You can stop the JBoss server by hitting CTRL-C in the command-line window. Creating a krb5.conf file The pre-flight documentation illustrated how to create the krb5.conf and login.conf files for your environment. It also introduced you to the HelloKDC java program that makes use of these files. Copy the krb5.conf file that you created earlier to the 
If you are running JBoss as a Windows Service, the location of the file may be different. Creating a login.conf file JBoss does not use a login.conf file but instead uses a file named Append the following xml to the file just before the last end-tag named
The 
Registering an SPN If you have already registered the SPN(s) when you performed the Tomcat install then you will not have to perform them again. Otherwise, take a look at the Tomcat install for instructions on how to register your SPN(s). WARNING: A given SPN can only be registered to one and only one Windows NT Domain Account. If you decide to register a given SPN, be sure that it is not already registered to another Windows NT Domain Account. Otherwise, you will have to de-register/delete the mapping before registering the SPN to the other account. Creating the hello_spnego.jsp file Create the following hello_spnego.jsp file under the
<html>
<head>
    <title>Hello SPNEGO Example</title>
</head>
<body>
Hello <%= request.getRemoteUser() %> !
</body>
</html>
Restart the server and login into a workstation before performing the test in the next section. Testing hello_spnego.jsp The steps for testing hello_spnego.jsp running on JBoss are exactly the same as for Tomcat. Take a look at the Tomcat install and follow the steps. If all is working correctly you should see the following (without being prompted): 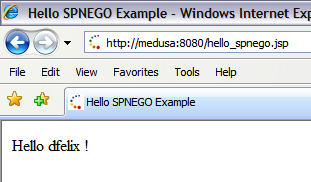
Lastly, just as the javax.servlet.http.HttpServletRequest API is an interface that defines the method named getRemoteUser, in addition the API defines the method named isUserInRole. The SPNEGO Library also implements the isUserInRole method. In this guide, the SPNEGO Library was configured to perform authentication (authN). However, the SPNEGO Library define additional APIs as well as provide a reference implementation that allow for a more expressive authorization (authZ) scheme. If in addition to authenticating the user, you also need to check the user's authorization credentials, take a look at the enable authZ with LDAP guide. The javadocs for the SpnegoAccessControl interface, the UserAccessControl interface, and the LdapAccessControl class contain authorization usage examples.Troubleshooting hello_spnego.jsp The best way to troubleshoot hello_spnego.jsp is to run TCPMon. Take a look at the Troubleshooting hello_spnego.jsp page for more details on using this tool.
Links:
Troubleshooting:
Examples:
Licensing:
© 2009 Darwin V. Felix. All rights reserved.
|